
Tracking Method Logic
This article is broken up into several sections. Use the links below to go to the section you are interested in.
Tracking Method Logic is used to automatically determine a guest’s eligibility. You are basically writing code using a combination of blocks and conditions that are provided at the bottom of every tracking method. Don't get worried, the process is easy and just like creating a yes/no flow chart. If you get stuck you can always contact our awesome support staff to help you through it.
How it Works
The logic that you create is done by setting conditions to test against a particular guest field. The condition will look at the guest field and see if it is set to Yes or No (for a Yes/No custom field). The condition will then check the field setting to see if it matches what the condition is needing to pass the visit. If the condition is looking for a Yes to allow the visit and the result of the check is also a Yes, the visit is allowed to continue and no error messages are displayed. If the result of the check is No but the condition needs a Yes then the visit process is interrupted and an error massage will appear telling the volunteer why they are not eligible.
This example was for a simple Yes/No check, but this feature is not limited to only simple checks. You can create very complex checks against multiple fields within the guest record to validate their eligibility to participate in a visit or a program. Some examples of this would be "Income/Household Total" checks for TEFAP, "Age" tests for CSFP, Recertification Deadlines, that the guest is living in a Zip code or County, and much more.
How to Add Logic
Logic is built for each tracking method separately as each tracking method is used to manage it's particular good or service. Examples of Tracking Methods could be TEFAP, CSFP, pantry food, clothing, financial assistance etc.
You must first be on the edit page of the tracking method you wish to add the logic for. Go to Settings > Tracking Methods. Here you will find the different tracking methods your agency currently uses. Choose the tracking method you want to add logic to and click the edit link. Take care to not click the delete link as deleting your visit history would not be a good thing. Once you have the tracking method edit screen open scroll to the bottom of the page. You will see the section labeled “Guest Conditions” and below that you will see a button for “Add Block” and “Add Condition”.
Blocks and Conditions
The block is a home for conditions to attach to. The block is responsible for collecting the results of each of the conditions that it contains. True or false values are returned from the conditions within the block and the block will report its status to the "Parent Block" above it. Here is a screen shot of a block and a condition.
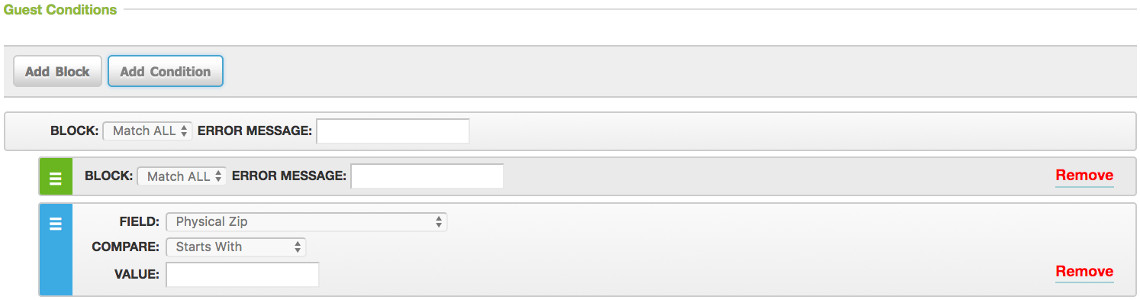
Let’s explain what we see in this image and what the different elements are and what they do.
At the top, you will see the buttons that allow you to add blocks or conditions. Click on the appropriate button as many times as you need to get the correct number of blocks or conditions you need. There is no limit to the number of blocks or conditions you can use.

Below these buttons is the Primary Block. In the primary block you will find a drop down that allows for selecting “Match All” or “Match Any”. All blocks will have this drop down selection and you will choose between the two options based on how you want the logic to work for that block. The Primary Block will always be gray. The blocks and conditions you add will be either green or blue based on an alternating order.


Below the primary block is a block I added using the “Add Block” button. Its left end is colored green which shows you it is an argument that reports to the Primary Block. An argument is an element that performs a test and returns a result. Since there are no conditions attached to this block, the block will pass true as that is its default. In all cases you would not see a block without at least one argument / condition attached to it, normally two or more.

Below the green block is a condition that I added earlier. Notice it has a blue end. The blue end is a visual identifier that signifies this is a separate argument that returns results to the “Primary Block”. The conditions have three fields that allow you to set them in such a fashion to test against something and return a true or false to its parent block or primary block depending on how it is attached.

Both blocks and conditions have the ability to be deleted if needed, just click on the “Remove” link. The remove link is red and is located to the far right hand side of the block or condition. You will get a warning but if you say ok to remove, the element and all its contents will be deleted.
Nesting
Nesting is where you move a condition or block into a block. A block and a condition can be nested into a block but a condition can not nest into a condition. Conditions and blocks can not nest into the Primary block as they are already considered to be a part of the primary block.
To nest the two together I placed my mouse over the blue end of the condition, it was blue to start with, look at the earlier example. I clicked the blue bar and while holding down the mouse button I gently moved the condition a little to the right and up into the green portion of the block above it. You will know when it nests because the blue end of the condition will turn green and the green part of the block will extend down to show it is now part of the block.
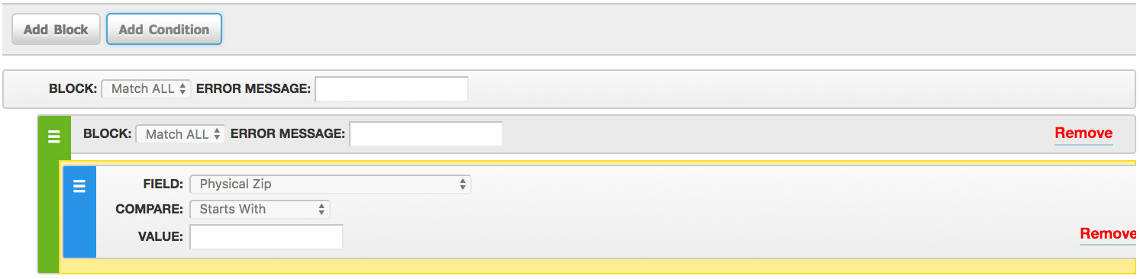

When you nest blocks and conditions together you turn them into a single argument that would report to the Parent Block. This is displayed by turning them both green or both blue when they are nested together.

Nesting Layers
This is where you have blocks that contain conditions but one nested block is nested into another block with conditions.
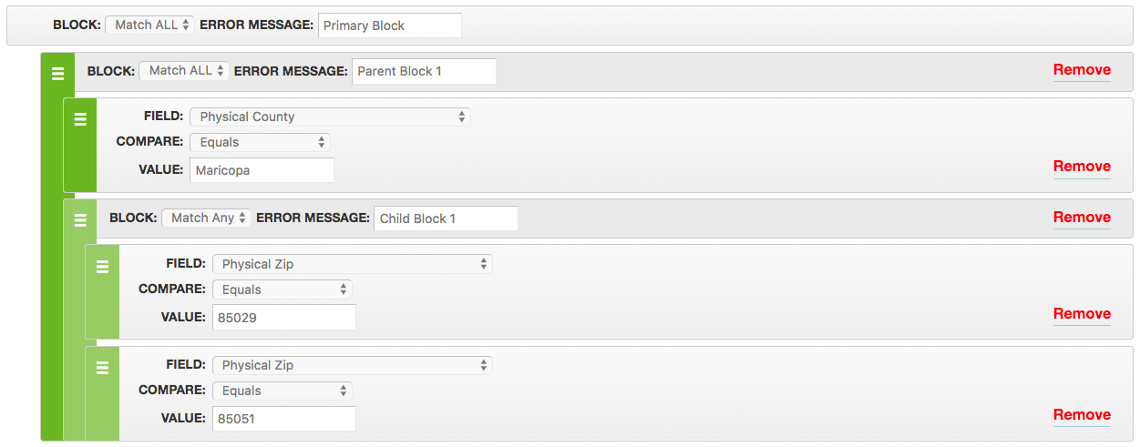
In this image I added a block and two conditions, nested them together and then nested the new set into the existing block and condition. This creates nested condition sets. You can visually see this by noticing that the shade of green in the block (labeled "Child Block 1" in the error message field) is a slightly lighter green. Each new nest layer will alternate between the two shades of green (dark and light) for easier identification of a nested condition set.
In this example the logic is looking to see if you reside in Maricopa County and have either 85029 or 85051 as your zip code. If you do not meet the county requirement and at least one of the zip code requirements the logic will send a false to the Primary Block showing you are ineligible for the service handled by this tracking method.
Do you see why the logic in this example works that way?
Dissecting the Block

A block has three areas you need to be familiar with.
- The Match All / Match Any switch which is circled in red.
- Match All - When this is selected every nested block and condition must be met to return a true result. Think of it this way, for me to ride this roller coaster I must be 42” tall and at least 8 years old.
- Match Any – When this is selected any nested block or condition that is met will return a true result. Think of it this way, for me to ride this roller coaster I must be 42” tall or at least 8 years old.
- The Error Message box circled in blue. This allows you to have a custom message show in the help desired next to the service on the client visit page that tells the computer operator why they do not qualify, when the result from the block returns false. If the block returns true the error message will not display.
- Remove - circled in black, which is a link that will delete this block and anything nested within it. Tip: Be absolutely sure you want that element and all blocks and conditions nested within it to be deleted. You can always un-nest the elements you want saved, then rebuild the logic accordingly.
Dissecting a Condition
Conditions are used to test one field in the guest record and return a true or false to its parent block. This is accomplished by the use of the three fields within the condition. There is a Field box, a Compare box and a Value box for every condition. To understand what each field can do and how to use them let’s get into some details.
- Field box: This field allows you to find and choose the guest field you want to run a test against. It is configured by clicking the drop down arrow on its right side and scrolling through the field list until you find the field you desire. You can only test against guest record fields, visit fields are not available.
- Compare box: This field has comparison operators that is used to tell the system how to test the field selected in the Field box against the data entered in the value box. You will see things like "is equal", "not equal", "greater than", "less than" type of operators. We will look at each field type and discuss each operator available and how to use them.
- Value box: This field is where you enter in the value that will be checked to return a true or false. So if you are looking at testing a yes/no field and want to return a true if the value in this field is yes, you would enter yes in the value box. If the field tested is set to yes then a true result is passed to the parent block and If the field tested is set to no than a false is passed to the parent block.
Condition Settings for each Field Type
As we look at how each custom field type works we will show the field within the guest record and the options available when configuring the condition field in logic.
Field Type: Yes/No Field
Field as it would appear in the guest record.

Field - Use the drop down arrow to the right, scroll through the list of fields available and locate and click on the field that matches the example above.

Compare – This field has two options to select. Remember this checks the field above against the value below based on the operator you choose in this field.
- Equals: This will check to see if the choice in the value field matches the value set in the guest record. If they match a true result will be passed.
- Not Equal: This will check to see if the choice in the value field 'does not match' the value set in the guest record. If they do not match a true result will be passed.

Value – This field has two options to select when configuring this condition. Remember this is the value that the compare field checks against when testing the guest record.
- Yes: In this example the No is selected (see above), setting this to test for Yes would cause the guest to be ineligible and an error message would be displayed.
- No: In this example the No is selected (see above), setting this to test for No would cause the guest to be eligible and able to receive this service.

There are many uses for this and it is dependent on what you’re checking for and how you want to see the results. Like in this example you use a Yes/No custom field to identify if the client is disabled. Because you have a particular program that requires that the recipient is disabled you can put in a test to see if Disable equals Yes. If Yes they qualify, if No is the answer then they would not qualify and the computer operator would see an error message that would explain why they do not qualify.

Remember to think like this when configuring a Yes/No field, if they 'do' or 'do not' have yes, or if they 'do' or 'do not' have no. There are four directions that can be used to test for a result.
Field Type: Select Box
Field as it would appear in the guest record.

Field - Use the drop down arrow to the right, scroll through the list of fields available and locate and click on the field that matches the example above.

Compare – This field has two options to select. Remember this checks the field above against the value below based on the operator you choose in this field.
- Equals: This will check to see if the choice in the value field matches the value set in the guest record. If they match a true result will be passed.
- Not Equal: This will check to see if the choice in the value field 'does not match' the value set in the guest record. If they do not match a true result will be passed.

Value – This field will display the same options that were entered into the options field when creating this custom field. In this example I entered four selectable options, 'Select', 'Choice 1', 'Choice 2' and 'Choice 3'. Remember this is the value that the compare field checks against when testing this guest record field.

There are many uses for this type of field but it is dependent on what you’re checking for and how you want to see the results. In this example I have four options to choose from. When you look at how this condition is configured, a true result is passed when 'select' is what the guest record field is set to. 'Select' is normally used when using a select box as the first option is considered the default or generally viewed as the 'not answered' answer. If anything other than select is set in the guest record then the visit would fail.
You may be wondering in what scenario would you ever configure a test this way? Here is one, you use this field to identify certification elements that must be handled before a visit can be processed. The certification elements in this case are represented by the three choices. If you choose select then there are no blockers preventing the visit and the guest can be served. If you have one of the three choices selected in the guest record then a false is returned because the guest's certification is missing something, which is represented by the choice selected.

Remember to think like this when configuring the field, if they 'do' or 'do not meet' the requirement, or if they 'do' or 'do not fail to meet' the requirement. There are multiple directions that can be used to test for a result.
Field Type: Text Box
Field as it would appear in the guest record.

Field - Use the drop down arrow to the right, scroll through the list of fields available and locate and click on the field that matches the example above.

Compare – This field has five options to select. Remember this checks all of the data in the field above against the value below based on the operator you choose in this field. If you entered in more than one word 'string' then the operators look at that string as a whole and apply the checks accordingly.
- Starts With: Checks the 'Value' against the data (string) entered into this fields in the guest record to make sure the data it finds starts with the data in the value field. Example: The value field is set to Y then if the guest field has any word that starts with a Y will pass. Yes, Yellow and Yams would pass where Green would fail as it starts with G.
- Ends With: This does the same thing as starts with but checks to make sure the data (string) in the guest record ends with what is in the value. Example: s is entered in the value field so anything in the guest record like coins, pains, fingers would pass but monkey would fail.
- Equals: This will check to see if the choice in the value field matches the date (string) that was entered in the guest record. If they match a true result will be passed.
- Not Equal: This will check to see if the choice in the value field 'does not match' the data (string) set in the guest record. If they do not match a true result will be passed.
- Like (* as wildcard): This operator is similar to the equals option, but checks to see if the value matches any part of the data (string) entered in the guest record. Example: 'Like' is entered into the value field then if words such as 'likable', 'likeness', 'Everyone likes him' are entered in the guest record the test would pass.

Value – This is where you enter in the 'Value' that you want tested. In this example I left the 'Value' field empty because I want to make sure that this field 'is not empty'. You could also test to make sure 'it is empty' if the compare field is set to 'Equals'. Remember this is the value that the compare field checks against when testing this guest record field.

There are uses for this type of field but it is dependent on what you’re checking for and how you want to perform the test. In this example, I have the compare set to 'Not Equal' and the value is left empty. This will pass the test if anything is entered into the guest record field but fail if nothing is entered.
You may be wondering in what scenario would you ever configure a test this way? Here is one, you use this field to identify if data in entered in this field before a visit can be processed, essentially making this field 'required'.
Remember to think like this when configuring the field, if they 'do' or 'do not meet' the requirement, or if they 'do' or 'do not fail to meet' the requirement. There are multiple directions that can be used to test for a result.
Field Type: Text Area
Logic is not available for a 'Text Area' custom field type

Field Type: Radio Buttons
Field as it would appear in the guest record. Notice that all selectable options show.

Field - Use the drop down arrow to the right, scroll through the list of fields available and locate and click on the field that matches the example above.

Compare – This field has two options to select. Remember this checks the field above against the value below based on the operator you choose in this field.
- Equals: This will check to see if the choice in the value field matches the value set in the guest record. If they match a true result will be passed.
- Not Equal: This will check to see if the choice in the value field 'does not match' the value set in the guest record. If they do not match a true result will be passed.

Value – This field will display the same options that were entered into the options field when creating this custom field. In this example I entered four selectable options, 'Not Answered', 'Choice 1', 'Choice 2' and 'Choice 3'. Remember this is the value that the compare field checks against when testing this guest record field.

There are many uses for this type of field but it is dependent on what you’re checking for and how you want to see the results. In this example I have four options to choose from. When you look at how this condition is configured, a false result is passed when 'Not Answered' is what the guest record field is set to. 'Not Answered' is normally used when using a Radio Buttons field as there is no default but if answered incorrectly you still need to check something so 'Not Answered' is generally used as the 'not answered' answer. If anything other than 'Not Answered' is set in the guest record then the visit will pass.

Remember to think like this when configuring the field, if they 'do' or 'do not meet' the requirement, or if they 'do' or 'do not fail to meet' the requirement. There are multiple directions that can be used to test for a result.
Field Type: Checkboxes
Field as it would appear in the guest record. Notice that all selectable options show and you can check more than one.

Field - Use the drop down arrow to the right, scroll through the list of fields available and locate and click on the field that matches the example above.

Compare – This field has two options to select. Remember this checks the field above against the value below based on the operator you choose in this field.
- Equals: This will check to see if the choice in the value field matches the value set in the guest record. If they match a true result will be passed.
- Not Equal: This will check to see if the choice in the value field 'does not match' the value set in the guest record. If they do not match a true result will be passed.

Value – This field will display the same options that were entered into the options field when creating this custom field. In this example I entered four selectable options, 'Not Answered', 'Choice 1', 'Choice 2' and 'Choice 3'. Remember this is the value that the compare field checks against when testing this guest record field.

There are many uses for this type of field but it is dependent on what you’re checking for and how you want to see the results. In this example I have four options to choose from. When you look at how this condition is configured, a false result is passed when 'Not Answered' is what the guest record field is set to. 'Not Answered' is normally used in this type of field as a true 'Not Answered' answer. This field type does not have a default answer because you can check or uncheck any selectable option as needed. If anything other than 'Not Answered' is set in the guest record and the field has at least one answer (can not be empty) then the visit will pass.
The condition can only test for one possible result, if you need two or more options selected to pass you would have to add a second or third condition and set them to test the other required selected options. Be sure to nest the conditions into a single block and set the block to 'Match All' or 'Match Any' to test if 'all of the options' are checked or 'any of the options' are checked to pass.

Remember to think like this when configuring the field, if they 'do' or 'do not meet' the requirement, or if they 'do' or 'do not fail to meet' the requirement. There are multiple directions that can be used to test for a result.
Field Type: Date
Field as it would appear in the guest record. This is a standard date field. When you click in it you will get a pop up date picker to assist you in choosing a date. You can also type in the date but you need to follow this format YYYY-MM-DD. Months and Days need to have a preceeding 0 if only one digit like February being the 2nd month needs to be entered in 02. Example February 2, 2017 would look like 2017-02-02.

Field - Use the drop down arrow to the right, scroll through the list of fields available and locate and click on the field that matches the example above.

Compare – This field has three options to select. Remember this checks the field above against the value below based on the operator you choose in this field.
- Date Equals: This will check to see if the choice in the value field matches the date set in the guest record. If they match a true result will be passed.
- Date After: This will check to see if the choice in the value field 'is after' the value set in the guest record. If the result is within the set limit a true result will be passed.
- Date Before: This will check to see if the choice in the value field 'is before' the value set in the guest record. If the result is within the set limit a true result will be passed.
The 'Date After' and 'Date Before' compare options can both be used to get the required result, the result would depend on how you format the 'Value'.

Value – This field does all the work and is probably the most confusing one to work with. It is our hope that with the examples provided it will take the mystery out of using it, just follow the settings displayed for the way you want the date check to work.
For the Developers: This value field follows the normal 'stringtotime' options in php. You can do some pretty amazing tests, but you will have to play with the commands to get the desired results.

There are many uses for this type of field but it is dependent on what you’re checking for and how you are using date fields. I am providing three examples, 'Certified Until Date (Good Until Date)', 'Certified On Date' and an 'Age Test'.
Certified Until Date (Good Until Date):
This setup is used when you set a date into the future when the guest will need to be recertified, until that date is reached they are considered certified and can receive services.
How it works: The system takes todays date and tests it against the date in the guest record using the compare value set. In this example if the date in the guest record is after todays date then true is passed but if on the same date or before then a false is sent preventing the visit.


Certified On Date:
This setup is used when you set the date they were certified on. Normally you would want to recertify them in a year, but the time to recertification can be any time period you desire. You will just need to adjust the 'Value' field accordingly. This example is for a yearly re-certification.
How it works: This setup takes todays date and subtracts 365 days from it creating a new date (one year ago) then tests it against the date in the guest record using the compare value set. As long as the guest record date is after or newer than the date a year ago, a true will pass but if older than the new created date a fail will be passed preventing the visit. This will create a fail if on the anniversary, but if you wish the anniversary to be valid add an additional day by changing it to '-366 day'.


Age Test:
This setup is used to verify the primary account holder is at least a certain age. Normally this is used to test for the age to qualify for 'Senior Box' 60 years old or older. This example is testing that the guest is 60 years old or older.
The '-60 year' is the part that determines the age requirement. If your age limit is different, say 64, then use 64 instead of 60 in this example.
The '+ 1 day' is added to make sure the guest passes on their actual birthday. If omitted they would not be eligible until the day after their birthday.
How it works: The test is taking todays date, subtracting 60 years from it and then adding one day to the result. Then it takes the new result and makes sure the 'Date of Birth' field is before (older) than the result date. If it is older then a pass is given, if after the result date then it will fail as they are not at least the age asked for.


Field Type: Number
Field as it would appear in the guest record.

Field - Use the drop down arrow to the right, scroll through the list of fields available and locate and click on the field that matches the example above.

Compare – This field has six options to select. Remember this checks the number in the field above against the value below based on the operator you choose in this field.
- Equal To: Checks the 'Value' against the number entered into this field in the guest record to make sure the number it finds is the same as the number in the value field. Example: The value field is set to 5 then if the guest field has a 5 it will pass. Anything other than a five in the guest record would cause it to fail.
- Greater Than: Checks the 'Value' against the number entered into this field in the guest record to make sure the number it finds is greater than the number in the value field. Example: The value field is set to 5 then if the guest field has a 6 or any number greater then 5 it will pass. Any number less than 6 in the guest record would cause it to fail.
- Greater Than Equal To: Checks the 'Value' against the number entered into this field in the guest record to make sure the number it finds is greater than or equal to the number in the value field. Example: The value field is set to 5 then if the guest field has a 5 or any number greater then 5 it will pass. Any number less than 5 in the guest record would cause it to fail.
- Less Than: Checks the 'Value' against the number entered into this field in the guest record to make sure the number it finds is less than the number in the value field. Example: The value field is set to 5 then if the guest field has a 4 or any number less then 4 it will pass. Any number greater than 4 in the guest record would cause it to fail.
- Less Than Equal To: Checks the 'Value' against the number entered into this field in the guest record to make sure the number it finds is less than or equal to the number in the value field. Example: The value field is set to 5 then if the guest field has a 5 or any number less then 5 it will pass. Any number greater than 5 in the guest record would cause it to fail.
- Not Equal: Checks the 'Value' against the number entered into this field in the guest record to make sure the number it finds is not the same as the number in the value field. Example: The value field is set to 5 then if the guest field has a 5 it will fail. Anything other than a five in the guest record would cause it to pass.

Value – This is where you enter in the 'Value' that you want tested. In this example I entered in the number 5 to test against. With the value being a 5 and the guest field having a five in it, three compare operators will pass this setup and three will cause a fail. Can you tell which ones will pass and which ones will fail?

There are uses for this type of field but it is dependent on what you’re checking for and how you want to perform the test. In this example, the 'Equal To', 'Greater Than Equal To' and the 'Less Than Equal To' will pass this setup.
Remember to think like this when configuring the field, if they 'do' or 'do not meet' the requirement, or if they 'do' or 'do not fail to meet' the requirement. There are multiple directions that can be used to test for a result.
Field Type: Email and Phone
Logic is not available for the 'Email' and 'Phone' custom field types.